Devsoap - Build. Deploy. Innovate.

To subscribe to this RSS feed add https://devsoap.com/rss/ to your RSS Feed reader!

Blog entries:

5 Java power tools for 2023

Top 5 Java libraries and tools for 2023
5 Java power tools for 2023

I find modern Java really powerful these days but there are always tools to even further kill boilerplate and make Java programming more fun.

Here are the tools I find myself always sneaking in into projects.

1. JsonPath - Json parser for deep hierarchies

https://github.com/json-path/JsonPath

Are you tired of writing Jackson response models for your responses yet?

If you are working with deeply nested JSON structures you get for example with GraphQL responses then you know the pain.

An alternative to modelling the responses as classes is to use JsonPath to pull data from the response.

Say for example we have the following response json:

{
  "records": [
    {
      "department": "Engineering",
      "contact": {
         "name": "John",
         "details": {
            "age": 23,
            "address": {
               "city": "Marbella",
               "country": "Spain"
            }
         }
      }
    },
    ...
  ]
}

Say you now want to list all countries in the records?

Using plain Jackson class models you would probably define a model for root class as RecordsResponse, then further models for a single Record and then the nested Contact, Details and Address. The iterate the list of records using the Stream API to collect all the countries. But that is a lot of boilerplate!

With JsonPath we can do this without all the model boilerplate.

First we fetch the response as a nested Map and then we just use JsonPath to traverse the Map hierarchy to collect the countries.

Here is the same example with JsonPath:

Map<String,Object> response = client.get(..., Map.class);
List<String> countries = JsonPath.read(response, 	"$.records[*].contact.details.address.country")

No boilerplate, much more readable.

2. Lombok - Annotation driven magic

https://github.com/projectlombok/lombok

Love it or hate it, annotation driven development has come here to stay. And with good reason, Lombok is classic which kills more boilerplate code then any tool.

One of the most used examples I use it for is getting rid of boilerplate constructors and getters/setters in  classes.

Here is a short example:

@Slf4j
@RequiredArgsConstructor
class MyService {
    
    @Getter
    private final MyRepository repository;
    
    public doIt() {
        repository.clear();
        log.info("I did it! I am free!")
    }
}

3. Vavr - Super powers for collections

https://www.vavr.io

I love the Java Stream API. It made working with Java collections finally fun.

But Vavr takes it to another level altogether, it adds super powers to the collections!

A  quick example:

List.of(1,2,3,1,4,5,6)
        .distinct() // 1,2,3,4,5,6
        .groupBy(v -> v  % 2) // (1,3,5), (2,4,6)
        .mapValues(Traversable::sum) // (1,9), (0, 12)
        .head() // (1,9)
        .swap() // (9,1)
        ._1() // 9

It is really the missing peace in collection handling. You data buffs will love it!

Check out the user guide for more examples https://docs.vavr.io.

4. Awaitility - Testing async tasks and threads

http://www.awaitility.org

A real power tool when you want to test your code that executes tasks on separate threads.

Lets take this example, let's say that in your Spring Boot application you have the following service method:

@Async("myTaskExecutor")
public void executeBackgroundTask() {
    ... perform some logic ...
}

If you are familiar with this code then you will know that the @Async annotation will instruct Spring Boot to run this code on an thread pool defined by the executor named myTaskExecutor.

Writing a JUnit test for this can be a pain, as you cannot assume that when you call this method that the code is executed immediately as the execution is delayed and put on a queue.  

To solve Awaitility implements a polling framework you can use to check if the code ever executed by checking the code outcomes.

Here is how the code could look like:

  await()
    .atMost(5, SECONDS)
    .until(() -> myCondition == true);

The library is quite powerful and supports quite a lot of use-cases.

The documentation at https://github.com/awaitility/awaitility/wiki/Usage#reusing-conditions is quite good.

5. Spotless Google Java Format Gradle plugin

https://github.com/diffplug/spotless

We all know how hard it is to agree on correct source formatting when working in development teams. Why not just avoid the discussion and use Google best practices for source code and move on with your life?

For this an excellent choice is the Google Java Format library and Gradle plugin!

Just throw it in your project, configure the features you want and let it automatically format your source before you submit your code.

The plugin can be found here https://github.com/diffplug/spotless


Dockerizing Java services with Gradle and Jib

This tutorial will show you how to package and publish your Java application with Docker and Google Jib.

Long gone are the days where we deployed our Java services into monolith Java application servers. In this tutorial I will show you how to deploy your Java (or any other JVM based) service or application as a Docker container to the cloud.

In this tutorial we will do the following:

  1. Building a docker image with Gradle using Google Jib
  2. Setting up a private docker registry on Docker Hub
  3. Publishing a docker image to Docker Hub

Building docker images with Gradle and Jib

Let's start with assuming you already have a Java based project that has a main class that will run your project. This can be a web application with an embedded server (Spring Boot, Ratpack, Micronaut,...), a Swing based desktop application or a terminal based application.

We are going to assume you are currently building the project with Gradle as that is the most sensible thing to do today.

Now, how are you going to package your application into a docker image and publish it?

The first thing that comes to mind is to manually add a Dockerfile to your directory and then run "docker build ." from a Gradle task.

Something like this:

task buildDockerImage(Exec) {
    command = "docker"
    args = "build -t my-image-0.1 ."
}

Well that was simple?!

Well not exactly. While this might work in the most simplest of cases it is far from the best we can do with Gradle.

The first thing you will notice is that you will need to first build the JAR to include in the docker image. So we need to add something like dependsOn jar to the task.

Then you'll notice that if the application has any dependencies then they won't be included. So you will need to

  1. Create a new task that assembles all dependency artifacts into a directory
  2. Include the generated directory into the image by referencing it via the Dockerfile and add the correct library deference to the ENTRYPOINT layer.

By now you probably have written around 50 lines of code in your build.gradle already. But hey, you might have it working!

So now you make one change in your source code and build again. And the whole docker container re-builds leaving you waiting for 5 minutes for every time you make a change...

:(

But as devops engineers we know that this can quickly be solved with layering our Dockerfile!

We can do that by making sure that our Jar file is added last in our Docker file so only the last layer changes. So we do that and add plenty of comments into our Dockerfile so everybody knows that they shouldn't go change the order in the Dockerfile.

But wait, you want to set the JVM parameters for the application dynamically so you can build for different environments and ensure the application does not take up too much memory.

But the JVM parameters are hard-coded in the ENTRYPOINT layer in the Dockerfile!

Hmm...

Right, so what we want to do is dynamically generate the Dockerfile so we can generate different files based on environment variables so we add a new task to our Gradle build that generates the Dockerfile, we then make our build task depend on that and use the Dockerfile as input.

Our Dockerfile is now 100 lines long, full of comments and inlined in the build.gradle file. Our work is done !?

We'll no, but lets stop here even if we are not done. You hopefully get the picture.

There is a better way.

Google Jib was made for this exact purpose. It will do all those things we did above (and much more) without you filling your Gradle build with error prone logic that (most likely if your are new to Gradle) will not work as you want anyway.

Lets have a look into how we would use Jib for that same use-case.

plugins {
   id "com.google.cloud.tools.jib" version "2.4.0"
}

version = 0.1
group = my.company

jib {
    from {
        image = "openjdk:14-slim"
    }
    to {
        image = "my-registry.some-provider.com/my-app"
        tags = [version, 'latest']
    }
    container {
        mainClass = "${group}.Application"
        jvmFlags = ["-Xms${findProperty('MEMORY')?:'256'}m", '-Xdebug']
        ports = ['80']
        volumes = ['/data']
        environment = [
            'VERSION': version
            'DATA_DIR': '/data',
            'APPLICATION_PORT' : '80',
            'DEVELOPMENT_MODE' : 'false'
        ]
    }
}

Lets go through that line-by-line:

Lines 1-3: Import the plugin from the Gradle plugin portal
Line 8: Jibs main configuration block
Lines 9-11: The source image to build from. We are building Java apps so we use a java image.
Lines 12-15: The target image we want to generate. We will come back to this when we talk about deployment.
Lines 16-27: The container definition defining how our Dockerfile will look like.

What this will do is the same as we tried to do ourselves; it will layer the docker container so that the minimal amounts of layers need to be re-created when doing changes, it will ensure all our dependencies (and transitive dependencies) are packaged into the image and it will ensure our application is executed with the corrent parameters and environment.

And best of all, all configuration is in Gradle so we can pass Gradle parameters to it. Right, lets test this out.

So to build an image we will execute the following task:

$ gradle jibDockerBuild

This will build the docker image for you locally on your machine. This allows us to test it out before we push it out into production.

The first time you build it will take a while as docker will need to pull in the base image as well as create all your application layers. Once that is done, rebuilding the application is usually a matter of seconds.

Once we have built our image successfully we can run the application by doing

$ docker run \
    -p 5555:80 \
    -v /home/john/mydata/:/data \
    my-registry.some-provider.com/my-app:latest

So now we can develop and test the application while we continue development. Next we will take a look at how we can push our image to production by setting up a docker registry and pushing our image there.

Setting up a private docker registry on Docker Hub

One of the key things you will need when working with Docker in production is your own docker registry. There are two variants of those; a private registry or a public registry.

For Open Source projects a public registry is usually enough. Just be aware that when using a public registry always ensure you are not adding any database credentials or other secrets to either the application or the container as anyone can access those who has access to the registry.

Usually though we will have credentials or other secrets so we want to opt for a private repository.

There are multiple ways you can set up your own private docker registry. There are both free and paid for options you can use, but since we are starting out I'll look at some free and easy ways of getting started.

The first free option is to manually install the docker registry onto your production server.  You will need to set up authentication yourself and ensure that the server runs on HTTPS. If you are beginner with Docker I don't recommend this as it takes some knowledge how to correctly manage a docker registry.

Another option if you are working on Gitlab you can get a free private registry by using a Gitlab repository. Have a look at https://docs.gitlab.com/ee/user/packages/container_registry/ to set the registry up.

In this article though we are going with the grand-father of docker registries, Docker Hub.

Docker Hub offers one private repository for free while unlimited repositories will cost you $5/month. If you only have one docker application then this is perfect, and even if you have many, $5/month is not too bad.

To get started head over to https://hub.docker.com/ and sign up.

Once you are done you should see the Dashboard like this:

Docker Hub Dashboard

The Dasboard is still empty as we haven't yet created any containers. Lets fix that!

Create a new private repository for our application by clicking on the Create Repository button and you'll see this screen:

Just fill in the application name and a suitable description and the most important thing, select Private as the repository type.

Select Create and the repository will be created for you.

Docker Hub Private Repository Configuration

Once the repository is created a unique repository path is created for your repository (highlighted in red above). Copy this path somewhere as we will need it.

Now that we have our docker registry set up we need to make some modifications to our build configuration's to {} closure to take those into account.

....
jib {
...
    to {
        image = johndevs/my-app"
        tags = [version, 'latest']
        auth {
           username = findProperty('DOCKERHUB_USERNAME')
           password = findProperty('DOCKERHUB_PASSWORD')
        }
    }
...
}

First we set the image to match the registry path we got from Docker Hub above. Jib will by default assume that we are using Docker Hub if we haven't specified a explicit registry, for other registries it would look like this (image = registry.some.provider.com/johndevs/my-app).

Next, we need to provide the credentials for accessing the registry. We can do that in two ways;

We either do what we have done here, that is, we provide the credentials directly via the auth{} closure by using environment variables from the build environment.

Or the other option is to set the auth.credHelper property which will use the GIT credential helper to fetch the credentials. As that is a bit more involved to set up I have omitted that approach here.

We are now ready to push our image to production.

Publishing a docker image to Docker Hub

To push our image to production we use a different Gradle task than before when we were developing locally. We run the following:

$ gradle jib -PDOCKERHUB_USERNAME=***** -PDOCKERHUB_PASSWORD=********

We run the jib-task and provide the Docker Hub user-name and Password as properties to the build. Gradle will as before assemble the image and then if you gave the correct credentials it will push the image to Docker Hub.

You can verify that the image was successfully pushed by checking the dashboard:

Docker Hub Dasboard Successful Push

You'll see that our application just got updated.

Further if you open up the settings of that application you can see more details of the application.

Lets finally try to use the image from Docker Hub.

This is done exactly the same way as we did locally except that we need to first log in to Docker Hub before pulling the image.

$ docker login
Login with your Docker ID to push and pull images from Docker Hub. If you don't have a Docker ID, head over to https://hub.docker.com to create one.
Username: *******
Password: *******
WARNING! Your password will be stored unencrypted in /home/john/.docker/config.json.
Configure a credential helper to remove this warning. See
https://docs.docker.com/engine/reference/commandline/login/#credentials-store

Login Succeeded

As you could see we could also again use the credential helper to help us out with the login.

Once we are successfully logged in we can just run the application with

$ docker run \
    -p 5555:80 \
    -v /home/john/mydata/:/data \ 
    johndevs/my-app:latest

This time, Docker will first pull the image (with all its layers) from Docker Hub (instead of your local machine) and then run that container. This is essentially what you would set up in production as well.

So now you can package any Java application into a Docker container and distribute it via Docker to your users. Once you have done it once it will be trivial to push updates to your container and update your application in the future.


Introducing the DS Gradle Cloud Cache

DS Gradle Cloud Cache is a commercial distributed cache for Gradle that integrates with any Gradle build.
Introducing the DS Gradle Cloud Cache

One of the prominent features of using Gradle is the ability to seamlessly cache the artifacts of a build to provide a significant performance boost to the build. This is what sets the Gradle apart from other build systems like Maven or Ant.

While Gradle itself comes with a cache available to run on your local machine, or a docker container you can run in your local network to improve the builds, we feel that it is not yet enough.

So we are now introducing the DS Gradle Cloud Cache powered by Amazon S3.

DS Gradle Cloud cache

The DS Gradle Cloud Cache integrates into your Gradle build seamlessly and supports any project type. Weather you are building Java, C or Javascript projects, if your project is viable for caching, the DS Gradle Cloud Cache will work out of the box.

All official Gradle plugins as well as Devsoap plugins are highly optimized for caching so for best results you will get by combining those in your build.

On the contrary to the local caching methods mentioned above, the DS Gradle Cloud Cache uses Amazon S3 for object storage. This object storage is fully sponsored by Devsoap so you don't need to concern yourself with setting up an AWS account or configuring the AWS integration. The stability and performance of S3 is undeniable and even sharing cached objects with your teammates on the other side of the globe shouldn't be an issue.

One of the key aspects when designing the cache was to make it simple to use. In your Gradle build you only need to add the following to your settings.gradle file:

settings.gradle

// 1. Add the plugin
  plugins {
      id "com.devsoap.cache" version "1.0.2"
  }

  // 2. Assign your license details
  devsoap {
      email = '...'
      key = '...'
  }
  
  // Optional: Disable local build cache
  buildCache {
     local {
         enabled = false
     }
  }

If you already have purchased a subscription for another Devsoap product you can use those credentials. The cache is included in every subscription for free! If you don't yet have a subscription you can get one here.

And that is it! There is no other configuration needed besides the above. No extra tasks to run. The cache configuration is fully transparent. The next time you run your gradle build with --build-cache your project cache artifacts will be uploaded to the distributed cache.

The cache will hold your artifacts for one week (1 week retention policy) but you can at any time update the artifacts to keep them in the cache.

So why not take the cache into use **today?


** The product is only available for beta testers. If you want to participate please send an email to hello@devsoap.com.


Modern next-generation web apps with Web Assembly

Web Assembly is now embracing enterprise web applications. Join me in exploring how to build web applications with Web Assembly and C# in this tutorial.
Modern next-generation web apps with Web Assembly

Web Assembly is spreading like wildfire and it will revolutionize web development in the upcoming years. This will mean a new renaissance for system programming languages and will allow bringing truly tested programming paradigms to the web.

We have seen a lot of the gaming industry already taking it into use but there are also huge opportunities for enterprise web development we are just starting to see.

Big companies like Microsoft have already picked up on this and started working on enterprise-grade solutions for leveraging this new technology for making it easy and effortless to write web applications on C# and publish them as Web Assembly to the web. The technology is called Blazor.

To REST or not to REST API?

Today two types of approaches exist; frameworks that only run in the browser and can be connected to a data source using REST/SOAP or frameworks that run both on the server and in the browser and handles the communication internally.

A proven successful pattern today is that it is a better idea to split your web application into a server-side part where a clean REST API is provided and a client (browser) side part where you display your data.

By doing this we can easily swap out either part as technologies evolve without having to re-write the whole technology stack. Conversely, if you did select a framework that does not expose a clean API then you will be locked into that until you rewrite your whole application.

Because of this Microsoft has split the Blazor framework in two; Blazor Server (server-side execution) and Blazor WebAssembly (in-browser execution). In this article, I'm going to focus on the WebAssembly project as I believe separating the data from the representation will be the correct solution in the long run. This will also not lock you into the Microsoft stack.

Does it have UI components I can use?

One of the main features most developers are looking for when selecting an enterprise framework is if it does come with components. Ready-made components allow for an easy starting point and allow you to kickstart your project without thinking about styling too much.

The core framework does not come with components, but there are plenty of components available to choose from in the MatBlazor library.

Modern next-generation web apps with Web Assembly
Material Design components for Blazor (https://www.matblazor.com)

The MatBlazor project is free of charge so remember to support the authors by sponsoring the project if you take it into use.

Also, you can easily interop with other Javascript libraries, for example with ChartJS using this library to add charts to your applications.

Modern next-generation web apps with Web Assembly
Charts from ChartJS (https://www.chartjs.org)

Just remember that when you do Javascript interop you will not get the same performance as using native Web Assembly components.

How do I run the project

Here is a nice getting started video for those who rather watch videos:

Introduction to Blazor

Since the project is written in C# you will need to download and install that toolchain into your operating system. You will also need an IDE that supports C# and preferably also supports Blazor.

Start by installing the .NET Core library. You can either download it from here or if you are on Linux like I am, leverage the package manager to download it for you following these instructions.

Once you get the toolchain installed you will need an IDE. As far as I can tell there are two choices available; either the fully-fledged Visual Studio or the Open Source Visual Studio Code. I like Open Source more, so I've been using VS Code and it has worked splendidly.

Once you have got your tools and project set up you can set up a new project with this command line chant (or use the IDE tools to do it):

dotnet new -i Microsoft.AspNetCore.Blazor.Templates::3.0.0

You can compile and run the project on a development server with the following chant:

dotnet watch run

That will start a server and your compiled web assembly project will be served on localhost:5001. The watch-keyword there will make the server refresh after you have made a change to your source code.

To add the MatBlazor library you use the NuGet package manager (if you come from Java this is similar to what Maven/Gradle is) to add the library with like so:

dotnet add package MatBlazor 

And to add some nice charting components from ChartJS use:

dotnet add package ChartJs.Blazor

You get the picture :)

Once you want to go to production you can just compile the project with the following chant:

dotnet pack

Then just copy the generated HTML and Javascript files into whatever application server you use. No application servers need here!

Summary

This article is by no means an exhaustive introduction into Blazor and Web Assembly. I just wanted to give you a peek of what is on the horizon and what enterprise web development will look like in a few years. Blazor for WebAssembly only just recently came out of preview mode and is now ready for real enterprise testing.

If you want to learn more about Blazor there is a multitude of documentation around the internet, just search for "Blazor" and you'll find it. A good starting point would most likely be Microsoft's surprisingly good documentation.

Blazor and C# is by no mean the only solution you have, other system programming languages like Rust are also viable options and I bet we will see more in the future as more and more people move over.

If you want to get an edge on modern Web Development today I encourage you to take the leap today. You won't regret it!


Product licensing changing to Creative Commons

Devsoap product license is changing to the Creative Commons. Read more about what this means for your project here.
Product licensing changing to Creative Commons

The use of Open Source software have exploded in recent years and it has been amazing to watch how Open Source have grown from tightly nit communities advocating for a free licensing model to major companies, and basically the whole industry, leveraging Open Source software to build the software of the future.

However, as more businesses start to use open source software for their own commercial purposes it becomes unclear in many cases to whom the ownership of the product belongs. In some cases this can even lead to companies directly copy&pasting works for their own commercial benefit without any attribution to those who created the projects.

Some recent examples of this includes Google developers copying the hyperHTML library to become lit-html (as you can read about here) or Amazon copying MongoDB (along with other libraries) for their commercial purposes (as can be read more about here).

Edit: As a personal addition I can now add Vaadin to this where they forked the Gradle plugin I had been working on for years. You can read about it on this Vaadin forum thread https://vaadin.com/forum/thread/17830616/17918359.

These are just a few known examples, this is becoming a growing problem in the industry.

To this end I feel that the best way forward is to re-license all Open Source Devsoap products under a Creative Commons license, rather than the existing Apache license. More specifically the Creative Commons Attribution-NoDerivatives 4.0 International Public License which I feel addresses the most problematic parts of the existing licenses.

What does this mean in practice?

Right, for most people reading license texts causes migraines so lets instead go through what this change actually means via use-cases:

I use the Devsoap Gradle plugin in my Open Source hobby project by including it from the Gradle plugin repository.

You don't need to do any changes. You are using a pre-built version of the plugin and can continue to do so for all eternity.

I use the Devsoap Gradle plugin in my company's commercial project. We are including it from the Gradle plugin repository.

No changes are needed. Since you are using a pre-built version of the plugin provided by Devsoap you are free to continue using it to build and sell your software without any attribution.

Our company is building the plugin from sources internally and using that plugin to build our software within the company.

The license allows you to take the sources and build the software and use it for your own purposes. You are however not allowed to share those binaries with the public (upload to a public repository or distribute as a download) as that is considered a derivative work.

Our company wants to use the sources to build and publish a plugin for the public to use for free.

This is not permitted and does not follow the terms of the license. Please contact pro@devsoap.com to further discuss options.

Our company wants to use the sources to build and publish a plugin for the public to use for commercial purposes.

This is also not permissible.

--

As you can see nothing really changes if you are using the pre-built plugins provided by Devsoap from the Gradle plugins repository. You can continue to build both personal and commercial applications without any worry.

However, if you are modifying the sources and building the plugin and want to publish it as a derivative work to the public for external use you will need to contact Devsoap for permission.

I hope I clarified most cases, if you have any more questions regarding this don't hesitate to reach out via pro@devsoap.com or comment in the comments below. The website for the Creative Commons license also provides a nice summary of what the license provides, check it out at https://creativecommons.org/licenses/by-nd/4.0/.


New beta releases out for both Vaadin Flow and Vaadin 8

Beta versions of Vaadin Gradle plugins released to support Gradle 6.

Two new beta releases was released this weekend for both Vaadin 10-14 and for Vaadin 8. The new released beta versions are:

Vaadin 8 :
DS Gradle Vaadin Plugin                                     2.0.0.beta2

Vaadin 10/14 :
DS Gradle Vaadin Flow Plugin                            1.3.0.beta4

Preparing for Gradle 6

Gradle 6 will bring with it some breaking changes to the Gradle plugin API that will not be backward compatible across major versions. To start moving towards that direction the new beta versions will now require Gradle 5.6 as the minimum version of Gradle.

This means that if your project is using an older version of Gradle you will need to upgrade the version. If you are using the Gradle Wrapper (which you should) you need to update the wrapper version and re-run the wrapper task.

Getting to stable

The plugins will remain in beta until Gradle 6 is released. At that point, the plugins will require Gradle 6 to achieve the longest possible forward compatibility.


Gradle support for Vaadin 14 now available for PRO subscribers

Gradle Vaadin Flow plugin 1.3 is now available with support for Vaadin 14.

DS Gradle Vaadin Flow Plugin 1.3 with Javascript module support is now available!

For those of you who haven't followed the Vaadin Flow releases the 14:th release is actually a totally new framework with a totally new client side stack. The whole Vaadin client side stack was re-vamped to be on top of Javascript rather than using HTML templates and the client package manager was changed.

This brought with it a lot of changes.

For the Gradle plugin this meant that the whole client side handling needed to be re-done to support the new way of handling the Polymer 3 Javascript modules. The plugin also needed to start to support the internal details of how Vaadin determines between compatibility mode and the new NPM mode.

A lot also have changed regarding the project structure and plugin usage but many things are still the same. I probably will not be able to answer all the questions here but I'll try to answer the most obvious questions below. If you have more don't hesitate to ask them in the comments section below.

Let's start with the elephant in the room.

Why do you now charge money for the Vaadin 14 support?

With the constant large scale changes done by Vaadin to the framework it is no longer possible to maintain the plugin for free.

A big thank you to Vaadin, the main sponsor, and other sponsors who have been funding the project so far, it has made it possible to make this project for the community.

But I believe the only way Open Source can sustainably work in the long run is that everyone using the software need to pitch in. And that leads me to the new PRO subscriptions.

First off, to avoid confusion, the Devsoap PRO subscription is not tied to, or linked to the Vaadin provided PRO subscription in any way. It is solely a Devsoap service.

Moving forward the PRO subscriptions will allow everyone to only pitch in a little to make a difference. The more people join the effort, the more time I (and maybe others) will be able to pitch in and work on the plugin to bring you new features and maintain the plugin.

This also will make it easier for us to provide money bounties for the Vaadin community to make use of when maintaining the plugin. (Spoiler alert: There is already one bounty available, continue reading to learn more ;) )

How do I take the plugin into use?

If you are using Vaadin 10 - 14 (compatibility mode) you do not need to do anything, you can continue to use the plugin for free by just updating the plugin version to 1.3. Those Vaadin versions will always be free in the future as well.

If you want to take Vaadin 14 (non-compatibility mode) into use you will need a PRO subscription. You can get that from https://devsoap.com/store.

Once you've got the subscription credentials you need to add the following to the build.gradle file:

build.gradle

devsoap {
  email = <your email address you registred with>
  key = <your API key you received via email>
}

Once you got that set the plugin will work in non-compatiblity mode using NPM to resolve the dependencies.

As usual you can include the plugin by using the following in your gradle scripts:

build.gradle

plugins {
  id "com.devsoap.vaadin-flow" version "1.3"
}

For more information checkout the Getting started guide.

Is there any documentation available?

Some of the documentation has been already ported to Vaadin 14 in Devsoap Docs (https://docs.devsoap.com). Most of the new articles are behind the [PRO] tag so to view them you will again need your PRO credentials.

The documentation is an on-going effort and will improve as the plugin will stabilize further.

Is there a migration tool available?

No, not yet.

My suggestion is that if your already have been developing for a while on Vaadin 10-13 and have a large code base just continue using Vaadin 14 in compatibility mode. There is currently nothing you can gain by starting a migration to JS components right now.

For new projects I would suggest going with Vaadin 14. The plugin provides a nice task, vaadinCreateProject that will create the necessery stubs for your new project so you get the classes and resources in the correct folders from the get go.

You can read more about the project creation in this docs article.

What are the known limitations of the release?

Currently the plugin has a few limitations you should be aware of:

That is it for this release, I hope you didn't despair while waiting for NPM support and I do hope to you see you on Github.

I believe there are exciting times ahead for the Vaadin Gradle community!


Become a PRO (for the price of a coffee)

Introducing a new PRO subscription to get the features among the first, prioritized bug tickets, access to PRO only documentation and more.
Become a PRO (for the price of a coffee)

Writing software for the Open Source community and its developers is both fun and rewarding. You get to meet cool hombres and kick-ass chicks and at the same time do what we developers know best, code like a *****. This is why I've been doing this for so many years, and aim to do it for many more.

But at the same time, realities often set in and as with everything funding is needed for the most basic things. This is not only true for us coders, this is true for artists, musicians, politicians, lawyers and all other shady peeps. The difference is how transparent we are about it.

So, I've set up a PRO subscription which you can get for the price of one or two cappuccinos a month and with it you will get the following:

* I don't yet know how this would work as I am not gathering Github nicknames of PRO members. If you have any idea, let me know :)

Those are the initial things I came up with, if you can think of more just comment in the comment section below and I'll consider adding more features for the PRO members.

If you represent a school or other non-profit and think this is still too much but would like use the products, send a email to sponsor@devsoap.com and explain your situation. I believe we should all help each other out where we can.

You can buy a subscription via the Store, located at https://devsoap.com/store. It uses PayPal as the payment provider so you'll need a PayPal account.

Update 11.2.2019

Lots of you have opted to support our project via subscriptions, and that is awesome!

To make it even better  we have added a new product DS Gradle Cloud Cache to the subscription. Caching Gradle builds can improve your build time with up to 80% so we though our users should have easy access to the feature. We hope you like it and make good use of the cache!


3 things to look out for when using Spring Framework

Learn to write Spring applications that also will be a joy to evolve and improve in the future as well.

I have for some years been involved in evolving Java Web applications that were written with early versions of the Spring Framework into more modern incarnations. When doing this I have constantly stumbled upon these issues that make the application hard to maintain and develop further.

1 Database schema is exposed via API

This is the issue that by far causes issues for the clients I work with.

The major problem is that the Spring framework tutorials drive developers to this pattern which might look like a simple and easy solutions and will look good in a presentation, but in the end, once the application matures, turns out to become a real headache both from a security and maintainability aspect.

A code smell of this is when you start asking questions like this:

https://stackoverflow.com/q/26161080/4301255

There are multiple issues with exposing everything through the API layer.

From a security perspective the developer is no longer controlling what is exposed via the API from the application. All it takes for a developer to make a mistake is to add a new column to the database with some sensitive data and voilà, the sensitive information is immediately exposed via the end-point. You would need to have API schema tests that thoroughly tests that no unknown fields in the returned JSON are added to circumvent this. Most applications I've so far seen lack even the most basic tests, not to mention these kinds of corner-cases.

Another issue from a maintainability perspective is that when the database structure is directly exposed via the end-point, you are also locking the API down to whatever the database at that day happens to be.

As the application matures it is very likely you will need at some point a V2 of your API which returns a different JSON structure. This might occur when you add a new consumer of your service like another micro-service or a mobile client. The consumer of the service might have totally different needs of how your database schema looks like.

The way I've seen most developers solve this is to start adding extra transient fields to the existing entities returned by the repository. This of course affects V1 of the API that starts to get all this kind of extra information that it previously has not expected. Also the new clients will start getting all this extra information they need which was present in V1 of the API. The worst cases I've seen with this is that after you have added enough consumers and versions those entities need to be composed from almost every table in the database and the queries become slow and hard to understand.

Lets look at a better proven solution for this!

If you do not want to run into the above problems you cannot take the short path the Spring tutorials show. Forget about RestRepository, consider it an abstraction meant for demo purposes only.

You will need to use a layered approach to separate the data from the data representation returned via the API if you in the future want to have an better time maintaining and building on the API.

Instead, you could use a approach like this:

  1. Use a Repository for data layer only! Use it to fetch data only. A good indication of this is that your Entity classes does not contain any classes related to the JSON representation (like @JsonProperty) but only validation and query related annotations.
  2. Use a Service to mutate data, perform extra validations on the data. A good indication this is being done properly is that the service is the only class that accesses the repository. All data access goes through the service.
  3. Use a RestController to mutate data from entity returned by the service to the API JSON. Your RestController methods only return DTO's (Data-Transfer-Objects) and no entities. To convert between the entities and the DTO's use ModelMapper's TypeMaps! A good indication of good usage of DTO's is that the DTO does only contain JSON annotations and no database related annotations. Do not try to be smart and extend your Entity classes into DTO's ;)

Now, lets look at problems we had before and see how they can be solved with the above approach.

Now if a developer adds a new field to the database table it is exposed via the Entity class to the application but the API remains unchanged. The developer now have to manually add the field to the DTO if he wants to expose the information via the API as well. This forces the developer to think about what he is doing and weather it is a good idea or not.

Also the versioning problem goes away. Now that the API is using DTO's instead of Entity classes a new Controller or method can easily be added with a different DTO composed from the Entity. This means the application can provide different versions of the API without making changes to the data representation.

2 Data is only validated at database level or not at all

This is common scenario I also see where developers rely only on database constraints for data validation. Usually companies wake up to this only after there have been successful XSS or SQL injection attacks. At that point the data already is full of garbage and it will be really hard to get the data to become consistent and useful.

Another, leaner version of this is that validation is only done at one level, either at API or data level. The argument usually from developers is that it is wasteful to perform validation two times and validating what comes via the API should be enough.

However, I have seen it so many times that a simple coding mistake in the Controller or Service, or a security issue with the API validations has caused invalid data to end up in the database that could easily have been prevented.

If you have followed the solution in #1 to separate your API from your data layer then solving this should be as easy as applying the same validators to your DTO's as well as your Entity classes and always use @Valid for every input DTO in your Controller.

A good sign is that every field in both your DTO's and your Entity classes has some validator attached. This is especially true for String fields.

3 You don't need streams if you are not streaming data to the front-end or sending events

Most business applications today use REST as the main communication method both between services and between front-end and back-end. Unless you are working with a fully event driven architecture or you plan to move to one you should not pay much attention to the hype around streams today.

For applications related to processing numerical data (mostly IoT) they are useful, and most demos presented using streams are around this scenario where you have a numerical stream and you want to process that. By that is far from the CRUD application most businesses are using Spring for today and using the stream API to feed a CRUD with data and usually leads to these kinds of issues:

https://stackoverflow.com/a/46434000/4301255

On the surface this might seem neat. But lets dig into that a bit.

In the repository you need to now rely on query hints that all database might or might not support. In this case the developer is messaging the database driver to return everything. Depending on how good the database driver is and how modern the database is (which might be pretty old in the enterprise) that might cause performance issues.

The service method no longer provides what type of entities it handles. While with non-streaming operations the service would return a list or Stream of entities, here we are providing an output stream only without any notion of what will happen to it. This would be a nightmare to test.

One key element with data persistance is transactions. Traditionally streaming and transactions have not worked together and only recently Spring has gain some support for them for MongoDB and R2DBC neither of which are majorly used for enterprise data. You can read more about the support in the Pivotal blog https://spring.io/blog/2019/05/16/reactive-transactions-with-spring. To summerize you lose transactions if you stream.

Finally, lets look at the controller. We are returning StreamingResponseBody instead of clear list or stream of entities. Again making testing harding and opaque.

Remember KISS. If your application does not rely on data streams you don't need the Spring streaming API. But by all means do not confuse this with Java Streams which can be useful when doing data transformations.


I hope these simple three observations will help you build applications that not only works today, but will allow your application to grow and evolve without major refactoring and security issues. To achieve this the best advice I can give you is that never use the latest sexy solution provided by the vendor if it does not give significant improvements that are easily modifiable in the future.


Product documentation now available!

Product documentation now available at docs.devsoap.com!
Product documentation now available!

Using a library, extension or plugin can always be a hard without proper documentation. Especially if you are just jumping in to a new technology or language.

To better help developers get started with the DS products I am now happy to open up the Documentation site at docs.devsoap.com!

The documentation site offers full technical documentation into the details of how to use the products and in some cases how to develop them further.

The documentation site also offers the possibility to comment on specific pages to help others or to suggest or clarify unclear topics.

I hope this will help everyone in getting to know the DS products and use them in your projects. If you have improvement ideas on how to make the documentation better feel free to comment below.

Happy reading!


TodoMVC: Fullstack serverless applications (Part 2: The REST API)

Learn how to write REST API's with serverless FN Project functions as well as connecting them to AWS DynamoDB.

In this article lets explore how we can build a REST API using FN functions. This is the second part of our TodoMVC app we started building in the previous post. A demo running this project can be found here.

To build our back-end we are going to do two things; set up the REST API end-points and connect them to DynamoDB where we are going to store our todo items.

The API

The API we are going to create is a simple CRUD (Create-Read-Update-Delete) API for the Todo items.

There are multiple ways we could split this functionality up to FN functions.

  1. Handle all REST methods in one function
  2. Create one function for each REST method
  3. Create one function for read operations (GET) and one for write operations (PUT,POST,PATCH,DELETE)

Which approach you select depends on your use-case.

If we would have a lot of business logic then 2. might have been a better option as we could have split out our code based on operation. However, if we had done that then we wouldn't have been able to use pure REST as every function needs a unique path and with REST for example GET and POST might have the same path.

The third (3.) option might be interesting if we would anticipate that our application would have a lot of read requests but not that many write requests. By splitting it in this way we could load balance the read operations in a different way than write operations and maybe for read operations add more FN servers to provide a better throughput. With this approach you have the same downside as with 2. i.e. you will not be able to write a pure REST API.

We are going to select 1. as our business logic is really small and it allows us to use a single URL path for all operations we need for our TodoMVC app. We also don't anticipate a lot of requests so we don't have to care about load balancing.

Before we continue, lets recap how our project structure currently looks like after we added the UI logic in the previous post.

project-structure

So to add the API we start by creating a new submodule in the existing project for our back-end functionality.

todomvc-api-module

Next we will need to turn the module into a FN function to serve our REST API.

We start by removing any auto-generated src folder Intellij might have created for us. Then, open up the api/build.gradle file and add the following content:

/* 
 * We use ReplaceTokens to replace property file placeholders
 */ 
import org.apache.tools.ant.filters.ReplaceTokens

/* 
 * Main FN function configuration
 */
fn {
    functionClass = 'TodoAPI'
    functionMethod = 'handleRequest'
    functionPaths = ['/items']
}

/**
 * Configure FN Function timeouts
 */
fnDocker {
    idleTimeout = 30
    functionTimeout = 60
}

dependencies {
    compile 'com.amazonaws:aws-java-sdk-dynamodb:1.11.490'
    compile 'org.slf4j:slf4j-simple:1.7.25'
}

/**
 * Replaces the AWS credential placeholders with real credentials
 */
processResources {
    from(sourceSets.main.resources.srcDirs){
        filesMatching('aws-credentials.properties'){
            filter(ReplaceTokens, tokens: [
                'aws.accessKeyId' : System.getenv('AWS_ACCESS_KEY_ID') ?: project.findProperty('aws.accessKeyId') ?: '',
                'aws.secretKey' : System.getenv('AWS_SECRET_ACCESS_KEY') ?: project.findProperty('aws.secretKey') ?: '',
                'aws.region' : System.getenv('AWS_REGION') ?: project.findProperty('aws.region') ?: ''
            ])
        }
    }
}

Finally, we just invoke the :api:fnCreateProject task to create the function source stubs based on the previously created build configuration.

todomvc-create-api-function

Now our project structure looks like this
Final project structure

We are now ready to implement the TodoAPI.

Persistence with AWS DynamoDB

Now that we have our function ready, lets implement the persistence layer.

The first thing we will need is to model how the Todo items should look like in AWS DynamoDB. We can do that by creating a model class (TodoItem.java) that specifies how a single item is modeled:

@DynamoDBTable(tableName = "todomvc")
public class TodoItem implements Serializable {

    private String id = UUID.randomUUID().toString();
    private boolean active = true;
    private String description;

    @DynamoDBHashKey
    public String getId() { return id; }
    public void setId(String id) { this.id = id; }

    @DynamoDBAttribute
    public boolean isActive() { return active; }
    public void setActive(boolean active) { this.active = active; }

    @DynamoDBAttribute
    public String getDescription() { return description; }
    public void setDescription(String description) { this.description = description;}

    /**
     * Helper method to create a TodoItem from an InputStream
     */
    public static Optional<TodoItem> fromStream(InputStream stream) {
        try {
            return Optional.of(new ObjectMapper().readValue(stream, TodoItem.class));
        } catch (IOException e) {
            return Optional.empty();
        }
    }

    /**
     * Helper method to convert the items into a byte array
     */
    public Optional<byte[]> toBytes() {
        try {
            return Optional.of(new ObjectMapper().writeValueAsBytes(this));
        } catch (JsonProcessingException e) {
            return Optional.empty();
        }
    }

This is pretty much a standard POJO with some DynamoDB specific annotations to help serialize the object. Our model is pretty simple, every item will only need to have two fields to keep track of; description and active.

The id field is only there to help us uniquely identify an item so we can modify or remove it. We could just as well have used the description field as our DynamoDB key, but that would have implied that we wouldn't be able to store duplicate items in our todo list.

Now that we have our item model, let's get back to the API implementation.

For our todomvc application we will need to support the following actions:

To do that we are going to modify our function in TodoAPI.java a bit to handle all those cases with a switch-statement:

public OutputEvent handleRequest(HTTPGatewayContext context, InputEvent input) throws JsonProcessingException {
    switch (context.getMethod()) {
        case "GET": {
            return fromBytes(new ObjectMapper().writeValueAsBytes(getItems()), Success, JSON_CONTENT_TYPE);
        }
        case "POST": {
            return input.consumeBody(TodoItem::fromStream)
                    .map(this::addItem)
                    .flatMap(TodoItem::toBytes)
                    .map(bytes -> fromBytes(bytes, Success, JSON_CONTENT_TYPE))
                    .orElse(emptyResult(FunctionError));
        }
        case "PUT": {
            return input.consumeBody(TodoItem::fromStream)
                    .map(this::updateItem)
                    .flatMap(TodoItem::toBytes)
                    .map(bytes -> fromBytes(bytes, Success, JSON_CONTENT_TYPE))
                    .orElse(emptyResult(FunctionError));
        }
        case "DELETE": {
            return input.consumeBody(TodoItem::fromStream)
                    .map(this::deleteItem)
                    .flatMap(TodoItem::toBytes)
                    .map(bytes -> fromBytes(bytes, Success, JSON_CONTENT_TYPE))
                    .orElse(emptyResult(FunctionError));
        }
        default:
            return emptyResult(FunctionError);
    }
}

As you can see we start by modifying our function to inject the HTTPGatewayContext as well as the InputEvent so we can process the request. From the context we get the HTTP method used to call the function and from the input event we get the HTTP request body.

Next, depending on which HTTP method was used, we convert the HTTP body into our TodoItem model and save it to the database.

To help us understand how this gets saved to the database, lets look at the rest of TodoAPI.java:

public class TodoAPI {

    private static final String JSON_CONTENT_TYPE = "application/json";

    private final DynamoDBMapper dbMapper;

    public TodoAPI() {
        var awsProperties = getAWSProperties();
        var awsCredentials = new BasicAWSCredentials(
                awsProperties.getProperty("aws.accessKeyId"),
                awsProperties.getProperty("aws.secretKey"));
        var awsClient = AmazonDynamoDBClient.builder()
                .withRegion(awsProperties.getProperty("aws.region"))
                .withCredentials(new AWSStaticCredentialsProvider(awsCredentials))
                .build();

        dbMapper = new DynamoDBMapper(awsClient);
    }

    public OutputEvent handleRequest(HTTPGatewayContext context, InputEvent input) throws JsonProcessingException {
    // Implementation omitted
    }

    private List<TodoItem> getItems() {
        return new ArrayList<>(dbMapper.scan(TodoItem.class, new DynamoDBScanExpression()));
    }

    private TodoItem updateItem(TodoItem item) {
        dbMapper.save(item);
        return item;
    }

    private TodoItem addItem(TodoItem item) {
        dbMapper.save(item);
        return item;
    }

    private TodoItem deleteItem(TodoItem item) {
        dbMapper.delete(item);
        return item;
    }

    private static Properties getAWSProperties() {
        var awsProperties = new Properties();
        try {
           awsProperties.load(TodoAPI.class.getResourceAsStream("/aws-credentials.properties"));
        } catch (IOException e) {
            throw new RuntimeException("Failed to load AWS credentials!", e);
        }
        return awsProperties;
    }
}

As you probably noticed, we set up a DynamoDBMapper using the credentials we have stored in a file called aws-credentials.properties under our project resources.

If you check out the api/build.gradle file you will notice that we are populating the real credentials into the aws-credentials.properties file at build time.

Once we have the DynamoDBMapper it is a trivial task to query DynamoDB for items as well as add, update and remove items. The mapper will handle all communication for us.

Wrapping up

This is pretty much all there is to create a REST API using a FN Function.

We can now run the project as we did in the first part.

The difference will now be that both the UI and the API functions will be deployed to the FN server. If you want to try out the REST API it will be available under http://localhost:8080/t/todomvc/items .

The sources for the full example which you can check out and directly run is available in here. You will need valid AWS credentials to try out the example as well as create a new DynamoDB instance to host your data.


Gradle Vaadin Flow 1.0 released!

Gradle Vaadin Flow 1.0 provides you with the most performant and easy to use build integration for Vaadin Flow applications today.

Gradle Vaadin Flow 1.0 provides you with the most performant and easy to use build integration for Vaadin Flow applications today. I'm happy to announce that the plugin now has reached production ready status!

After 17 pre-releases and countless testing and bugfixes it is about time the plugin gets a stable release. I know some of you have been eagerly waiting for this :)

It has been a joy working on the plugin and a big thank you goes out to those who have tested the plugin and given excellent feedback at such an early stage of the project. I don't think it would have been possible to iron out most of the edges without your help.

A big thank you also goes out to the project sponsors who have made this project possible. By providing Open-Source sponsoring for the project they have made it possible to work on this project and provide you with a Gradle integration for your Vaadin projects. If you want to join them be sure to check out the Sponsorship page to find out how you also could help out with the project funding.

Here is s short list of features it provides:

For more information check out the product page.

But of course we are not done yet, we are only getting started!

Now it is your turn to take the project into use and give feedback of what is still missing or what does not work. If there is a feature or tweak you would like or you spot a bug that is preventing you from using the plugin be sure to submit an issue into the issue tracker over at Github.

To read more about the different releases and what they contained be sure to check out the blog articles , example projects, or the project wiki.

Happy building!


TodoMVC: Fullstack serverless applications (Part 1: The UI)

Learn how to write fullstack serverless Java web applications with Fn Project and ReactJS.

In this two part blog series we are going to look at how we can serve a full web application by only using FN Project Java serverless functions. We are going to do this by writing a classic TodoMvc application all the way from the UI with React to the persistence leveraging Amazon DynamoDB. In this first part we are going to focus on building the front-end while in the second part we finish the application by creating an API for the UI.

Why serverless?

When thinking of "serverless" or FAAS (Function-As-A-Service) you might think that the primary benefit is its simplicity, you don't have to care about running an application server and can focus on writing application code. While that is partly true, I think there are even more, more substantial benefits that can be considered.

Stateless

All serverless functions are stateless by design. Trying to save a state in a function simply will not work since after the function is executed the application is terminated and along with it all the memory it consumed. This means a lot less worries about memory leaks or data leaks and allows even junior developers to write safe applications.

Scalable

Serverless as a paradigm is similar to what micro-services provide. A way of cleanly separating functionality into smaller units or Bounded Contexts as Martin Fowler so famously put it. Serverless functions allows you to do the same as micro-services, group functions into serverless applications (like the one I will be showing) with the benefits of writing less boiler-plate code than traditional micro-service frameworks.

Cost effective

A common way to host your applications is to purchase a VPC from a vendor like Digital Ocean, or set up an Amazon EC2 instance and what you pay for is ultimately how much memory and CPU you are using. A common micro-service approach then is to deploy the application on an embedded application server like Jetty or Tomcat and then further wrap that inside a Docker container. The downside of this is that once that is deployed it will actively consume resources even while nobody is using your application and every micro-service will actually contain a fully fledged application server. In contrast, serverless functions only consume resources while they are active which means that you actually only pay for what you need. You can even further optimize on a function-basis if you've split your application wisely into functions so that the most used functionality of your application gets higher priority (and resources) while the less used gets less.

Of course, using serverless functions is not a silver bullet and comes with some considerations.

If you have a high-volume application it might be wise to split your application into a few micro-services that take the most load as they are always active and then implement serverless functions around those services for the less used functionality. It is also worth noting that serverless functions comes with a ramp-up time, i.e if the function is not hot (it hasn't been invoked in a while), it will take a few more milliseconds for it to start as the docker container wakes up from hibernation and cause a slight delay. You can affect this by tweaking the function but more about that later.

Creating our TodoMVC project

For those impatient ones who just want to browse the code, the full source code for this example can be found here https://github.com/devsoap/examples/todomvc-fn-java.

And here is the application live:

You can open the application full screen in a new tab clicking here

Getting started

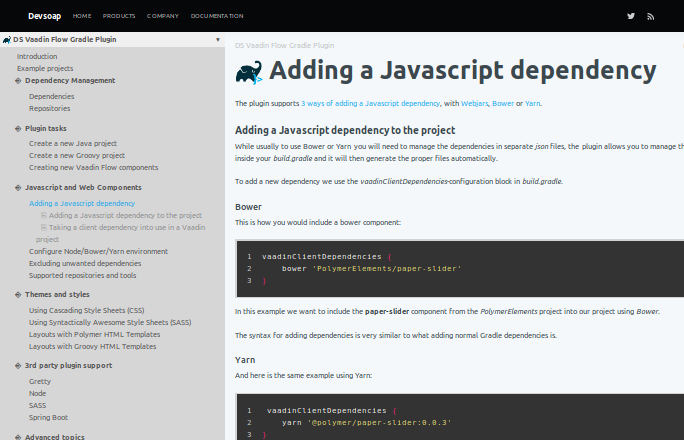
To create a new serverless app create a new Gradle project in Intellij IDEA and select Java. Like so:

Next we will need to configure our Gradle build to create Serverless applications.

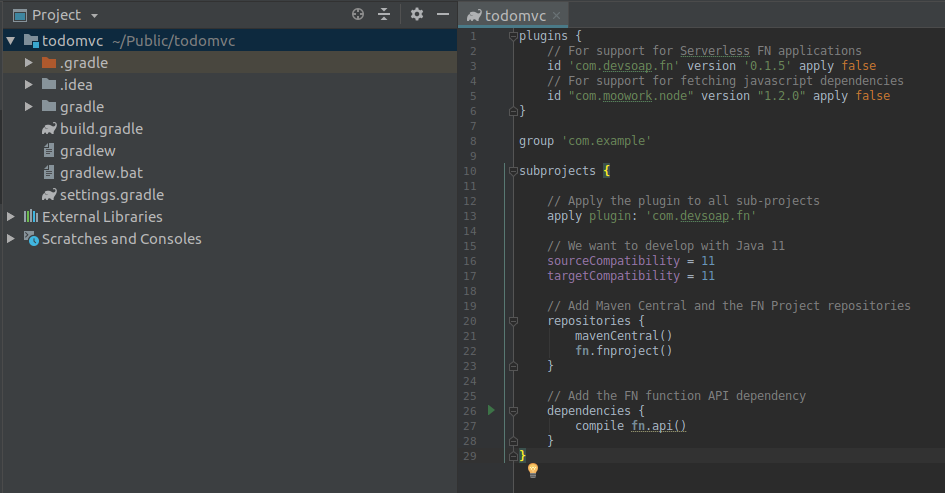
In the newly created project, open up the build.gradle file and replace its contents with the following:

plugins {
    // For support for Serverless FN applications
    id 'com.devsoap.fn' version '0.1.7' apply false
    // For support for fetching javascript dependencies
    id "com.moowork.node" version "1.2.0" apply false
}

group 'com.example'

subprojects {

    // Apply the plugin to all sub-projects
    apply plugin: 'com.devsoap.fn'

    // We want to develop with Java 11
    sourceCompatibility = 11
    targetCompatibility = 11

    // Add Maven Central and the FN Project repositories
    repositories {
        mavenCentral()
        fn.fnproject()
    }

    // Add the FN function API dependency
    dependencies {
        compile fn.api()
    }
}

As you probably already figured out we are going build a multi-module Gradle project where our sub-modules will be FN functions. To do that we leverage the Devsoap FN Gradle plugin as well as the Moowork Node plugin.

Also, you might want to remove any src folder that was generated for the parent project, our sources will be in the submodules.

Here is how it will look like:

Next, lets create our first function!

Right click on the project, and create a new UI module:

As we did before, remove any src folder which is automatically created.

Open up the ui/build.gradle file if it is not open yet, and replace the contents with the following:

apply plugin: 'com.moowork.node'

/**
 * Configure FN Function
 */
fn {
    // The name of the entrypoint class
    functionClass = 'TodoAppFunction'

    // To name of the entrypoint method
    functionMethod = 'handleRequest'

    // The available URL sub-paths
    functionPaths = [
            '/',
            '/favicon.ico',
            '/bundle.js',
            '/styles.css'
    ]
}

Lets take a look at what this means.

On the first line we are applying the Node Gradle plugin. We are later going to use it to compile our front-end React application.

Then we configure the Fn function.

functionClass will be th main class of our UI, this is the class which is called when somebody accesses our application.

functionMethod is the actual method that will get called. This will host our function logic.

functionPaths are all the sub-paths our function will listen to. We will have to implement some logic to handle all of these paths.

Right, now we have our function definition, but we don't yet have our function sources. Lets create them.

From the right-hand side gradle navigation menu, open up the UI Fn tasks groups and double-click on fnCreateFunction.

Lets have a look at the created function:

import static java.util.Optional.ofNullable;

public class TodoAppFunction {

    public String handleRequest(String input) {
        String name = ofNullable(input).filter(s -> !s.isEmpty()).orElse("world");
        return "Hello, " + name + "!";
    }
}    

It by default generates a basic Hello world type of function which is not very exciting. Lets now add our function logic to it so it looks like this:

/**
 * Serves our react UI via a function call
 */
public class TodoAppFunction {

    private static final String APP_NAME = "todomvc";

    /**
     * Handles the incoming function request
     *
     * @param context
     *      the request context
     *
     * @return
     *      the output event with the function output
     */
    public OutputEvent handleRequest(HTTPGatewayContext context) throws IOException {
        var url = context.getRequestURL();
        var filename = url.substring(url.lastIndexOf(APP_NAME) + APP_NAME.length());
        if("".equals(filename) || "/".equals(filename)) {
            filename = "/index.html";
        }

        var body = loadFileFromClasspath(filename);

        var contentType = Files.probeContentType(Paths.get(filename));
        if(filename.endsWith(".js")) {
            contentType = "application/javascript";
        } else if(filename.endsWith(".css")) {
            contentType = "text/css";
        }

        return OutputEvent.fromBytes(body, OutputEvent.Status.Success, contentType);
    }

    /**
     * Loads a file from inside the function jar archive
     *
     * @param filename
     *      the filename to load, must start with a /
     * @return
     *      the loaded file content
     */
    private static byte[] loadFileFromClasspath(String filename) throws IOException {
        var out = new ByteArrayOutputStream();
        try(var fileStream = TodoAppFunction.class.getResourceAsStream(filename)) {
            fileStream.transferTo(out);
        }
        return out.toByteArray();
    }
}

Lets look at the function implementation a bit:

We create a helper method loadFileFromClasspath that will load any file from the current function classpath. By using the helper method we will be able to serve any static resources via our function.

Next, to the meat of the bones, the handleRequest method. This is the entry point method where all requests will arrive that are made to the function.

If you remember from the function definition we did previously, we assigned four sub-paths to the url; '/', '/favicon.ico', '/bundle.js',
and '/styles.css'. What we simply do in handleRequest is examine the incoming URL and extract the filename from it. Then, load the file from our classpath. In essence, the function we have created is a static file loader!

What about security, will this mean that you can now load any file via this function? The answer is of course no, you will only be able to call the function with the give sub-paths in the function definition. Any other paths will just not arrive to this function.

Including the static files

We now have our function, but it will not yet return anything as we don't yet have the static files we have defined in our function definition.

Lets start with our bootstrap HTML file we want to serve.

We create a file named index.html and place it under src/main/resources. By placing the file there it will be included in our function resources and can be found from the classpath by using our function we defined above.

<!DOCTYPE html>
<html lang="en">
    <head>
        <meta charset="UTF-8">
        <title>TodoMVC - A fully serverless todo app!</title>
        <link rel="shortcut icon" href="todomvc/favicon.ico" />
        <link rel="stylesheet" type="text/css" href="todomvc/styles.css">
    </head>
    <body>
        <div id="todoapp" />
        <script src="todomvc/bundle.js"></script>
    </body>
</html>

Pretty basic stuff, we define a favicon and a css style sheet in the head section and in the body we define the root div-element and the bootstrap.js script for our React app.

Next we create a CSS file under src/main/resources and call it styles.css. In it we define some styles for the application:

body {
    background: #f5f5f5;
    font-weight: 100;
}
.container {
    background: #fff;
    width:600px;
    margin-left: auto;
    margin-right: auto;
}
h3 {
    color: rgba(175, 47, 47, 0.15);
    font-size: 100px;
    background: #f5f5f5;
    text-align: center;
    margin: 0;
}
.inner-container {
    border: 1px solid #eee;
    box-shadow: 0 0 2px 2px #eee
}
#new-todo {
    background: none;
    margin-top:10px;
    margin-left:5%;
    width:95%;
    font-size: 24px;
    height: 2em;
    border: 0;
}
.items {
    list-style: none;
    font-size: 24px;
}
.itemActive {
    width: 2em;
    height: 2em;
    background-color: white;
    border-radius: 50%;
    vertical-align: middle;
    border: 1px solid #ddd;
    -webkit-appearance: none;
    outline: none;
    cursor: pointer;
    margin-right:20px
}
.itemActive:checked {
    background-color: lightgreen;
}
.itemRemove {
    float:right;
    margin-right: 20px;
    color: lightcoral;
    text-decoration: none;
}
footer {
    width:100%;
    height:50px;
    line-height: 50px;
    color: #777
}
.itemsCompleted {
    padding-left: 20px;
}
.activeStateFilter {
    width:70%;
    float: right
}
.stateFilter {
    margin:10px;
    cursor: pointer;
     padding: 2px;
}

.stateFilter.active {
    border: 1px solid silver;
    border-radius: 4px
}

If you've done any webapps before this shouldn't be anything new.

Finally we download a nice favicon.ico file for our application and also place it under src/main/resources. You can find some nice ones from https://www.favicon.cc or design a new one yourself if you are the creative type. For our demo I chose this one.

Building the UI with React and Gradle

Now that we have our static files in place we still need to build our front-end React application.

We start by defining our front-end dependencies in a file called package.js in the root folder of the UI project. It will look like this:

{
    "name": "ui",
    "version": "1.0.0",
    "main": "index.js",
    "license": "MIT",
    "babel": {
        "presets": [
            "@babel/preset-env",
            "@babel/preset-react"
        ]
    },
    "scripts": {
        "bundle": "webpack-cli --config ./webpack.config.js --mode=production"
    },
    "devDependencies": {
        "@babel/core": "^7.2.2",
        "@babel/preset-env": "^7.3.1",
        "@babel/preset-react": "^7.0.0",
        "babel-loader": "^8.0.5",
        "css-loader": "^2.1.0",
        "html-webpack-inline-source-plugin": "^0.0.10",
        "html-webpack-plugin": "^3.2.0",
        "style-loader": "^0.23.1",
        "webpack": "^4.29.0",
        "webpack-cli": "^3.2.1"
    },
    "dependencies": {
        "babel": "^6.23.0",
        "babel-core": "^6.26.3",
        "react": "^16.7.0",
        "react-dom": "^16.7.0",
        "whatwg-fetch": "^3.0.0"
    }
}

This should be a very standard set of dependencies when building React apps.

Next we are going to use Webpack and Babel to bundle all our Javascript source files into one single bundle.js that also will get included in our static resources.

To do that we need to create another file, webpack.config.js in our UI root folder to tell the compiler how to locate and bundle our javascript files. In our case it will look like this:

var path = require('path');

module.exports = {
    entry: [
        'whatwg-fetch',
        './src/main/jsx/todo-app.js'
    ],
    output: {
        path: path.resolve(__dirname, './build/resources/main'),
        filename: 'bundle.js'
    },
    module: {
       rules: [
         {
           test: /\.(js|jsx)$/,
           exclude: /node_modules/,
           use: ['babel-loader']
         }
       ]
     },
     resolve: {
       extensions: ['*', '.js'],
     }
}

There are two noteworthy things I should mention about this.

In the entry section we are pointing to a javascript source file that will act as our main application entry point. In a moment we are going to create that file.

In output we are setting the path where we want to output the ready bundle.js file. In our case we want to output to build/resources/main as that is what Gradle will use when packaging our function.

Note: We could also have set the path to src/main/resources and it would have worked. But it is a good idea to separate generated files we don't commit to version control from static files we want to commit to version control.

Now that we have our configurations in place, we still need to instruct our Gradle build to build the front-end. We do so by adding the following task to our build.gradle file:

/**
 * Configre Node/NPM/YARN
 */
node {
    download = true
    version = '11.8.0'
}

/**
 * Bundles Javascript sources into a single JS bundle to be served by the function
 */
task bundleFrontend(type: YarnTask) {
    inputs.file project.file('package.json')
    inputs.file project.file('yarn.lock')
    inputs.files project.fileTree('src/main/html')
    inputs.files project.fileTree('src/main/jsx')
    outputs.file project.file('build/resources/main/bundle.js')
    yarnCommand = ['run', 'bundle']
}
jar.dependsOn(bundleFrontend)

What this task will do is download all necessary client dependencies using Yarn (package manager) and then it will compile our sources into the bundle.js file.

The last line indicates that whenever we are building the function we should do this to ensure the latest bundle is included in the function distribution.

Now the only thing we are missing are the actual Javascript source files. So we create a new directory src/main/jsx and in it we place two source files:

todo-app.js

import React from 'react';
import ReactDOM from 'react-dom';
import TodoList from './todo-list.js'

/**
 * Todo application main application view
 */
class TodoApp extends React.Component {

  constructor(props) {
    super(props);
    this.state = { items: [], filteredItems: [], text: '', filter: 'all' };
    this.handleChange = this.handleChange.bind(this);
    this.handleSubmit = this.handleSubmit.bind(this);
    this.handleActiveChange = this.handleActiveChange.bind(this);
    this.handleRemove = this.handleRemove.bind(this);
    this.handleFilterChange = this.handleFilterChange.bind(this);
  }

  componentDidMount() {
      fetch("todomvc/items")
        .then(result => { return result.json() })
        .then(json => { this.setState({items: json}) })
        .catch(ex => { console.log('parsing failed', ex) });
  }

  componentWillUpdate(nextProps, nextState) {
        if(nextState.filter === 'all') {
            nextState.filteredItems = nextState.items;
        } else if(nextState.filter === 'active') {
           nextState.filteredItems = nextState.items.filter(item => item.active);
        } else if(nextState.filter === 'completed') {
           nextState.filteredItems = nextState.items.filter(item => !item.active);
        }
  }

  render() {
    return (
      <div class="container">
        <h3>todos</h3>
        <div class="inner-container">
            <header class="itemInput">
                <form onSubmit={this.handleSubmit}>
                  <input
                    id="new-todo"
                    onChange={this.handleChange}
                    value={this.state.text}
                    placeholder="What needs to be done?"
                  />
                </form>
            </header>
            <section class="itemList">
                <TodoList items={this.state.filteredItems} onActiveChange={this.handleActiveChange} onRemove={this.handleRemove} />
            </section>
            <footer class="itemControls">
                <span class="itemsCompleted">{this.state.items.filter(item => item.active).length} items left</span>
                <span class="activeStateFilter">
                    <span filter="all" class={this.state.filter === 'all' ? "stateFilter active" : "stateFilter"} onClick={this.handleFilterChange}>All</span>
                    <span filter="active" class={this.state.filter === 'active' ? "stateFilter active" : "stateFilter"} onClick={this.handleFilterChange}>Active</span>
                    <span filter="completed" class={this.state.filter === 'completed' ? "stateFilter active" : "stateFilter"} onClick={this.handleFilterChange}>Completed</span>
                </span>
            </footer>
        </div>
      </div>
    );
  }

  handleChange(e) {
    this.setState({ text: e.target.value });
  }

  handleSubmit(e) {
    e.preventDefault();
    if (!this.state.text.length) {
      return;
    }

    const newItem = {
      description: this.state.text,
    };

    fetch('todomvc/items', {
      method: 'POST',
      headers: { 'Content-Type': 'application/json' },
      body: JSON.stringify(newItem)
    }).then(result => {
       return result.json();
    }).then(json => {
       this.setState( state => ({ items: state.items.concat(json), text: ''}) );
    }).catch(ex => {
      console.log('parsing failed', ex);
    });
  }

  handleActiveChange(newItem) {
    this.setState( state => ({
        text: '',
        items: state.items.map(oldItem => {
            if(oldItem.id === newItem.id) {
                fetch('todomvc/items', {
                      method: 'PUT',
                      headers: { 'Content-Type': 'application/json' },
                      body: JSON.stringify(newItem)
                }).then(result => {
                  return result.json();
               }).then(json => {
                  return json;
               })
            }
            return oldItem;
        })
    }));
  }

  handleRemove(item) {
    fetch('todomvc/items', {
          method: 'DELETE',
          headers: { 'Content-Type': 'application/json' },
          body: JSON.stringify(item)
    }).then( result => {
        this.setState(state => ({
            items: state.items.filter(oldItem => oldItem.id != item.id)
        }))
    });
  }

  handleFilterChange(e) {
    var filter = e.target.getAttribute("filter");
    this.setState( state => ({
        filter: filter
    }));
  }

}

ReactDOM.render(<TodoApp />, document.getElementById("todoapp"));

And todo-list.json:

import React from 'react';

/**
 * Todo list for managing todo list items
 */
export default class TodoList extends React.Component {

  render() {
    return (
      <ul>
        {this.props.items.map(item => (
          <li class="items" key={item.id}>
             <input class="itemActive" itemId={item.id} name="isDone" type="checkbox" checked={!item.active}
                     onChange={this.handleActiveChange.bind(this)} />
             <span class="itemDescription">{item.description}</span>
             <a class="itemRemove" itemId={item.id} href="#" onClick={this.handleRemove.bind(this)} >&#x2613;</a>
          </li>
        ))}
      </ul>
    );
  }

  handleActiveChange(e) {
    var itemId = e.target.getAttribute('itemId');
    var item = this.props.items.find ( item => { return item.id === itemId })
    item.active = !item.active;
    console.log("Changed active state of "+item.description + " to " + item.active);
    this.props.onActiveChange(item);
  }

  handleRemove(e) {
      var itemId = e.target.getAttribute('itemId');
      var item = this.props.items.find ( item => { return item.id === itemId })
      console.log("Removing item " + item.description);
      this.props.onRemove(item);
  }
}

Both of these javascript source files are pretty basic if you have done React before. if you haven't check any primer, the concepts used here are described in any resource available.

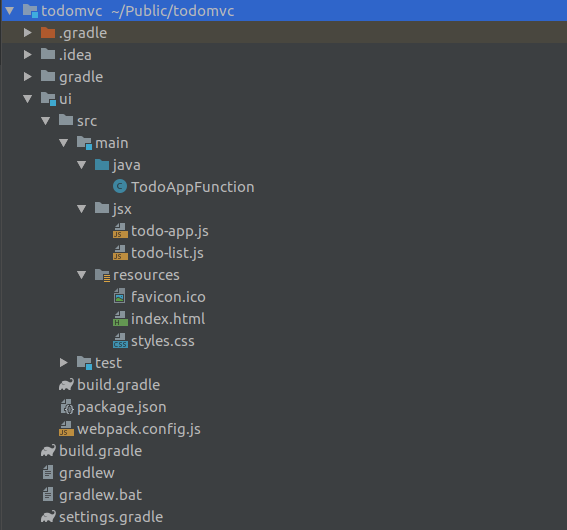
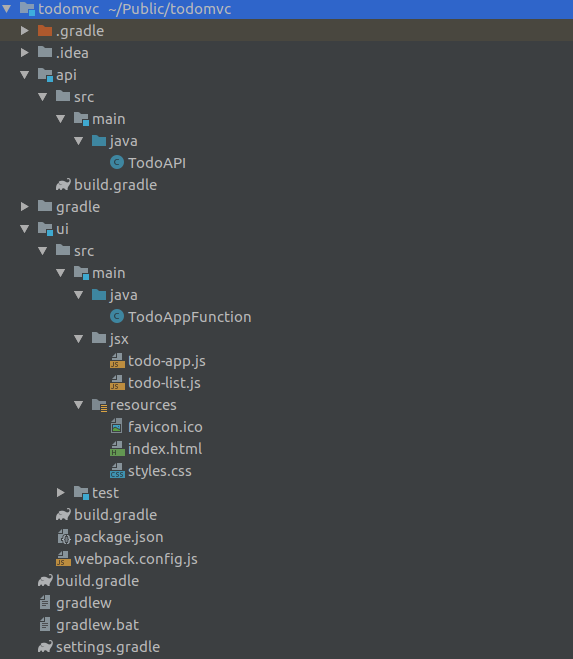
Now we have everything we need for our app. Lets have a final look how our project structure now looks like:
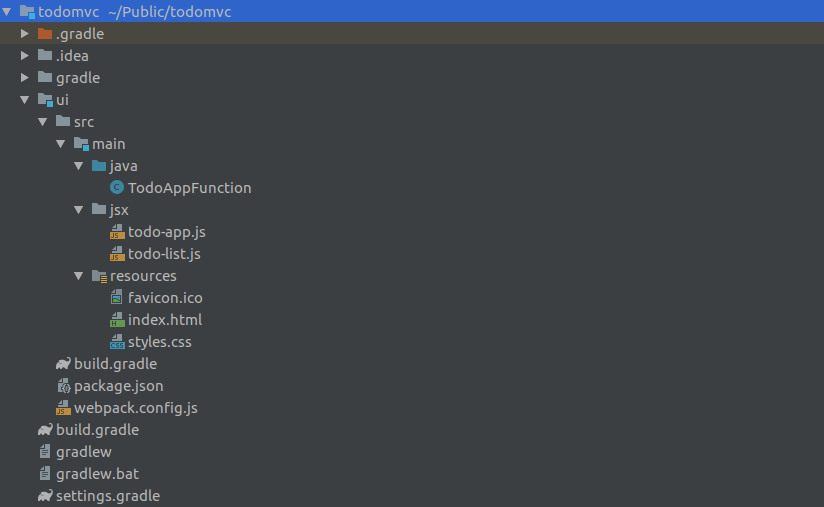
Final Project Structure

Running the project

Of course when we develop the project we also want to try it out on our local machine. Before you continue you will need Docker, so install that first.

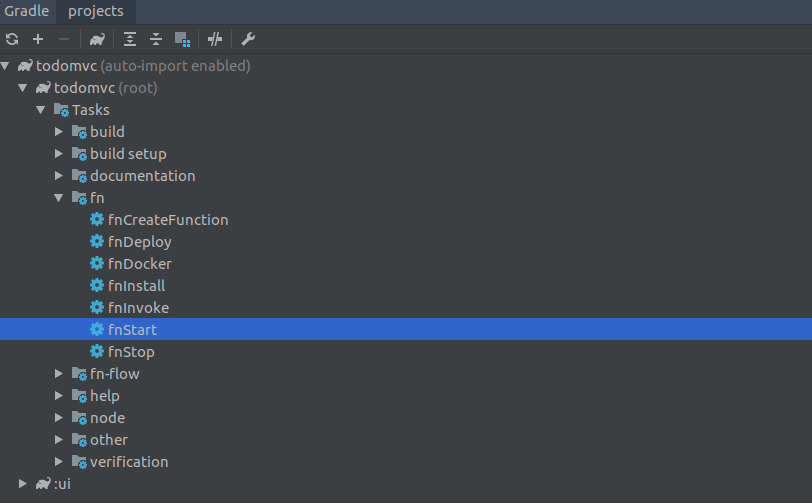
To get your development FN server running, run the fnStart task from the root project:

FN Server start

Once the server is running you can deploy the function by double-clicking on the fnDeploy task.

Once the function is deployed you should be able to access it on http://localhost:8080/t/todomvc.

To be Cont’d!

We are now finished with the front-end function. But if you run the application we just made you will notice it is not working.

In the next part we will finish the application and hook our front-end function up to our back-end API and DynamoDB. Check it out!


2018 in Review

A summary of what has happened on devsoap.com in 2018.
2018 in Review

The year 2018 has soon come to an end and I think this is a good time to look at what has been accomplished this year before we move on to the next one.

We started the year in February by examining how we can improve keeping all those Maven dependencies in check and up to date by creating dependency version reports in Dependency version reports with Maven. In the article we learned how to leverage Groovy to read Maven plugin text reports and convert them to color encoded HTML reports.

In March the first version of the Gradle Vaadin Flow Plugin was released to support building Vaadin 10 projects with Gradle. The launch was described in Building Vaadin Flow apps with Gradle where we examined the basics of how the plugin worked.

In April the Gradle Vaadin Flow Plugin was improved to work with Javascript Web Components as can be read from here Using Web Components in Vaadin with Gradle.

In May the Gradle Vaadin Flow Plugin got its first support for Vaadin production mode. To read more about production mode check out this article Production ready Gradle Vaadin Flow applications.

We also examined how we can build robust, functional micro-services with Groovy and Ratpack in Building RESTful Web Services with Groovy. As a side note this has been the most read blog article the whole year so if you haven't read it yet, you have missed out!

In June the Gradle Vaadin Flow Plugin got support for Polymer custom styles as well as improvements to creating new Web components in Vaadin 10+ projects. The release notes (Gradle Vaadin Flow plugin M3 released) from that time reveals more about that.

In July we took a look at Gradle plugin development and how we can more easily define optional inputs for Gradle tasks in Defining optional input files and directories for Gradle tasks.

A new version of the Gradle Vaadin Flow Plugin was also released with new support for the Gradle Cache, HTML/Javascript bundling, Web Templates and Maven BOM support. Wow, what a release that was! The new features were described in Gradle Vaadin Flow plugin M4 released.

In September we took a look at using alternate JVM languages (Groovy and Kotlin) to build our Vaadin 10 applications with in Groovy and Kotlin with Vaadin 10.

While in October the Gradle Vaadin Flow Plugin got a new version again, this time with Spring Boot support and multi-module support.

The release also brought a controversial breaking change in requiring Gradle 5 due to the backward incompatible changes to the BOM support done in Gradle 5. However, it is starting to look like a good choice now that Gradle 5 is out and working for at least most of the community.

In late October or early November we also saw the second Devsoap product released. A new Gradle plugin Fn Project Gradle Plugin for building serverless functions on top of Oracle's FN server.

The plugin allowed to leverage Gradle to both develop and deploy the functions using all common JVM languages (Java, Groovy and Kotlin) both locally and to remotely running FN servers. The plugin is still in heavy development but already is used for projects around the world. To read more about the plugin checkout the article Groovy functions with Oracle Fn Project.

In November the Gradle Vaadin Flow Plugin went into Release Candidate state where the last bug fixes and improvements are still made to make the plugin a stable production ready release. This means it is very likely that early 2019 we will see the first stable release of the plugin so stay tuned ;)

--

Looking back that is a whole lot of new releases and articles to fit into 2018. Beyond that the year has seen a lot of more minor releases and a lot of discussions on Github and elsewhere regarding the products. It has been good to see the communities we are involved in has embraced these new ideas and I'm certainly looking forward to what 2019 will bring.

Have a good new year every one and see you in 2019!


Groovy functions with Oracle Fn Project

In this introduction I'll show you how you can easily start building your Fn Project functions with Groovy and Gradle.

The Fn Project is a new Open Source FAAS (Function-As-A-Service) framework by Oracle. In contrast to what Amazon or Google provides this framework is fully open source and can be set up on your local hardware or on any VPC provider. In this short introduction I'll show you how you can easily start building your functions with Groovy and Gradle.

The FN Project framework consists of many parts to be able to load balance and scale the framework infrastructure so it might seem daunting. But don't worry, you won't need any of that for this tutorial! We are only going to look into how we can develop a function and deploy it to a single server, the operations part can come later. There are a few things you need to install first though.

To be able to run the Fn Server you will need a Docker enabled host. So if you don't yet have Docker installed install it first.

You also will need to have Gradle installed.

You have Docker and Gradle installed now? Good!

Before we begin, the question we got to ask ourselves first is, what is a Fn function anyway?

A Fn function is in essence a small program that has some inputs (the HTTP Request) and from those inputs will produce some output (the HTTP Response). It does not really matter in which programming language the function is written as long as the inputs and outputs are defined. In fact the Oracle Fn Project is programming language agnostic and allows you to use any language you prefer if you want.

But if our functions can be written in any language, how can it all be deployed on the same server?

This is where Docker comes in. Every function is wrapped in a Docker image provided by the Fn Project that handles routing the HTTP request information from the FN Server to the function running in the Docker container and routing the response from your function back to the caller. This is what the Fn Project maintainers calls cloud native. While all this routing might sound tricky (and most likely is internally), for the function developer it is made fully transparent.

If you already took a look at the Fn Project documentation you most likely noticed that currently they offer the following language choices of writing functions:

They also offer a CLI for simplifying creating functions in those languages.

However, while all of those are good languages and the CLI is ok to use I felt that I wanted a bit more mature tool stack to work with, so I set out to write support for using Gradle to both build and deploy the function and allow developers also to leverage Groovy for writing functions.

Introducing a new Gradle plugin for building Groovy Fn functions

For a full introduction to the Gradle plugin see its Product Features page.

So lets have a look at how we can write our functions with Groovy and deploy it with Gradle!

Start by creating a new folder (in this example I used hello-fn as the folder name) somewhere on your system.

In that folder add an empty build.gradle file.

The new plugin is located the Gradle Plugin Portal so you can easily include it in your project by adding the following to your build.gradle:

plugins {
    id 'groovy'
    id 'com.devsoap.fn' version '0.1.7'
}

After you have applied the plugin the following tasks will be made available for your gradle project (you can check by running gradle tasks):

Fn tasks
--------
fnCreateFunction - Creates a Fn Function project
fnDeploy - Deploys the function to the server
fnDocker - Generates the docker file
fnInstall - Installs the FN CLI
fnInvoke - Invokes the function on the server
fnStart - Starts the local FN Server
fnStop - Stops the local FN Server

Before we run any of the tasks, we still need to add a bit of configuration to our build.gradle so the Gradle plugin knows how to create a correct function.

fnDocker {
    functionClass = 'com.example.HelloWorld'
    functionMethod = 'sayHello'
}

We will also need some more dependencies so add those as well:

repositories {
    mavenCentral()
    maven { url 'https://dl.bintray.com/fnproject/fnproject' }
}

dependencies {
    compile 'org.codehaus.groovy:groovy-all:2.5.3'
    compile "com.fnproject.fn:api:1.0.74"
}

Right, now we are ready to run the fnCreateFunction task to create our function structure.

Once you have run the task it should have created the following folder structure:

hello-fn
├── build.gradle
└── src
    └── main
        └── groovy
            └── com
                └── example
                    └── HelloWorld.groovy
                    

Not much boiler plate code there.

Lets have a look at the generated HelloWorld.groovy class:

package com.example

class HelloWorld {

    String sayHello(String input) {
        String name = input ?: 'world'
        "Hello, $name!"
    }
}

It couldn't be much simpler than this, it is a simple class with one method, sayHello, that takes a string input and assumes it is a name and returns a greeting for that name.

Of course in real-world situations you will most likely want to do a lot more like reading request headers, setting response headers and generating different content-type payloads. This is all achievable using the Java FDK the FN Project provides.

Deploying the function locally

Now that we have our function, we most likely want to test it out locally before we put it in production.

To start the development server locally the Gradle plugin provides you with an easy task to use, fnStart. When you run that task it will download the CLI and start the FN Server on your local Docker instance.

$ docker ps
CONTAINER ID        IMAGE                COMMAND             CREATED             STATUS              PORTS                              NAMES
30c96567802a        fnproject/fnserver   "./fnserver"        5 seconds ago       Up 4 seconds        2375/tcp, 0.0.0.0:8080->8080/tcp   fnserver

Once it successfully has started it should be running on port 8080. If you want to stop the server you can run fnStop which will terminate the server.

Once the server is running we can deploy our function there. This can be achieved by running fnDeploy.

It will first build a docker image and then deploy the image to the FN Server.

$ gradle fnDeploy
> Task :fnDeploy

Building image hello-fn:latest 

BUILD SUCCESSFUL in 23s
6 actionable tasks: 6 executed

If everything went fine the function should now be deployed and ready to use.

Testing our function locally

The plugin comes with a built in way of testing our running function.

By using the task fnInvoke we can issue a request to the function.

$ gradle fnInvoke

> Task :fnInvoke
Hello, world!

And if we post some input to the function:

$ gradle fnInvoke --method=POST --input=John

> Task :fnInvoke
Hello, John!

Of course the fnInvoke function is limited in what it can do and for more advanced use-cases we might want to use a separate app for testing queries (my favourite being Insomnia :) ).

To do that point your REST client to http://localhost:8080/t/<app name>/<trigger name> where in the example case the app name and trigger name is the same so the url would be http://localhost:8080/hello-fn/hello-fn. This is also what fnInvoke calls in the background.

Development tip: While developing the function locally you can make Gradle continuously monitor the source files and when you change something then it will automatically re-deploy the function. You can do that by running the fnDeploy task with the -t parameter like so gradle -t fnDeploy.

Taking the function to production

Once you have the function working locally you can deploy it to production quite easily by adding a few parameters to build.gradle.

fnDeploy {
  registry = '<docker registry url>'
  api = '<FN Server URL>'
}

Now if you run the fnDeploy task the function will be deployed to your remote Docker registry and FN Server.

And beyond...

This was just a short introduction into how you can work with Gradle and Groovy to make your functions. There are plenty of other fun things you can do with these functions, for example if you want to see a bit more advanced demo you can have a look at the CORS proxy example here https://github.com/devsoap/examples/tree/master/fn-cors-proxy.

For more information about how to use the plugin see https://github.com/devsoap/fn-gradle-plugin

If you find any issues do not hesitate to create an issue at https://github.com/devsoap/fn-gradle-plugin/issues

Thanks for reading, I hope to get your feedback on this project!